Categories

Showing posts with label How to. Show all posts

Sunday, May 20, 2012

Play audio from YouTube without video in iPhone

Ever wonder how to play the YouTube songs without the video or display in iPhone. "Yes", it is possible with a little workaround but it works like a charm.

Steps:
1) Play your song or music from YouTube in your iPhone
2) Press the home button (This will pause the audio/video)
3) Press the home button twice quickly (Similar to double click in a computer)
4) You will see the iOS task manager
5) Keep your finger on the task manager section and "Slide from left to right"
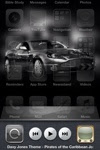
6) You will see the Orientation lock, Previous, Play, Next and YouTube icon.
7) Press the play button and listen... :)
8) Only audio will be played and video will be disabled.
Note:
You can press the home button and lock your iphone - the music still goes on.
The above steps works for music, pandora and most music related apps.
Step 2 is little annoying, but this is a workaround. 

Sometimes, I listen to songs/music which are not in my collection. Hence, this saves my battery and it don't look like I'm watching videos during official hours... lol... :)

Monday, December 12, 2011

iPhone photos to computer

I was talking to one of my friend and we ran into a conversation of how to transfer iPhone photos to computer. Here is a small post about it.

Now a days we all carry mobile phones with camera and taking/sharing more pictures in mobile phones. I carry an iPhone so I’m giving the steps to transfer iPhone photos to computer. We do not need iTunes or sync up for this.

Steps for Windows users:
Camera mode:
1) Connect iPhone to your computer using the charging/sync cable
2) Open “My Computer” in your windows computer 
3) iPhone will be displayed as “Digital Camera”
4) Double click and open it as a folder and subsequent folders until you see all the pictures taken in iPhone
5) Now you can cut/copy/remove the photos you like
Import mode:
First time users may not be able to see the pictures in that case follow the steps below:
1) Connect iPhone to your computer
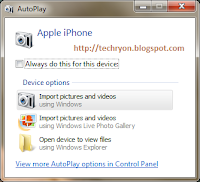
2) Windows will prompt with the Auto play window
3) Click “Import pictures and videos”
4) Import pictures window will be displayed
5) Click Import settings to find out where the photos are going to be imported


If you are a first time user and do not want all the photos to be imported.
1) Follow the 4 steps in Import mode
2) Close the Import pictures window
3) Click Yes for cancel importing
4) Now follow the steps provided in Camera mode

Ask me your questions through comments, if you face any other issues while copying iPhone photos to computer.


If you want to know how to make your own ring tones for iPhone: Read here

Tuesday, November 15, 2011

Use Bing to book cheap tickets

Bing has a built-in price predictor powered by expedia which can be used to decide and buy your flight tickets cheap.

Whenever we want to check for cheap airfare, we use the Internet travel websites like Orbitz, Expedia etc., But we don't know when the prices go up or down. Making decision on buying or waiting for cheap ticket price is the tricky part.

The Price Predictor in Bing helps in resolving this issue, not 100% but to some extent.
Enter your From and To destination in Bing's flight search. In the results page look at the Price Predictor Tip. The predictor is so simple and more details can be found under the Details & Fare history.

You can set up your fare alert to get emails about the change in airfare.
 Nowadays I am using this to book my flight tickets for cheap price. It’s really helpful, try and feel the difference.


Saturday, November 5, 2011

Speedup your computer by stopping unwanted startup programs

This is a simple way to speed your computer without any external or 3rd party softwares. Startup programs are (full or part) softwares that loads, when you start/boot your computer.

Whenever we install new softwares, most softwares by default add them to startup list. Some provide an option during installation, but we hardly notice that option (its either a checkbox or a quick msg display). After a period of time, this makes Windows start time to rise constantly.

Windows comes with a small utility called “msconfig”. Using msconfig you can deselect some unwanted startup programs. These may be your most used programs but you dont want them during startup.

Steps for Windows / Windows 7 user:
1) Click Start button
2) Type msconfig in the Search box 
     (Note: XP, 2000 and below - Type this in Run window)
3) Select the startup tab (picture below)
4) Uncheck the programs which you know and feel they are not necessary during startup
(Leave the processor and OS related softwares)
5) Click Apply and OK
6) Click Restart and you are done. (You can choose to restart later also)
7) Your computer will boot little faster than before


Saturday, October 29, 2011

iOS 5 features you want to know - Part 1

After updating to iOS 5, I am slowly exploring the different features and changes they made. I am trying to cover those from an end user perspective, skipping the most advertised or already known features.

1) Zoom:
Zooming has been changed to pinch action in iOS 5, just like when you zoom a photo or a web page. Double tap / single tap on the screen is used to focus an object on the screen.
i) Open camera app
ii) Use pinch action (zoom inward or zoom outward)
iii) Adjust your zoom level and take the picture :)

2) Maps
    Route suggestions are added in iOS 5. Three suggested routes appear when we search for directions. Double tap the Route number to select that particular route.
    i) Open maps app
    ii) Search for direction (Start & End)
    iii) Double tap Route number to select

3) Reader
    Reader feature has been added to Safari browser. The reader mode is really good / nice to read the contents of a web page. It skips the unnecessary ads and makes the fonts little bigger for easy reading. You can add web pages to reading list using “Add to reading list”, just like how you add URL’s to book mark any website
    i) Open Safari app
    ii) Load any web page
    iii) Click the Reader button (in Safari address bar)
    iv) Read the contents quickly and easily

4) Purchased Apps
    Now app store has ‘Purchased’ link under updates. All your downloaded / purchased apps are available there (including deleted apps, so you can re-install later). If you run into a problem of losing all / few of your apps, this helps to recover your purchased apps. But you have to install apps one by one, there is no bulk install. You can hide some app from showing in that list by swiping your finger (right to left or left to right).
    i) Open App store
    ii) Select updates tab
    iii) Purchased link displays on the top

5) Snooze
    Yeah, its not a new feature but the changes made to the snooze button during alarm is nice. Alarm now has the “Snooze” button displaying in red, which is easy to see when you look at the phone from sleep :)
    i) No different steps guys, just the same old steps... :)


Monday, October 17, 2011

How to create your own iPhone ringtones

Everybody (including myself) wants to have a nice ringtone for their iPhone. May be a latest song or music or even their own voice. Is there a way to create custom ringtones for free? Yes we do, it just takes few steps.
Searching for ringtones in internet, ringtone creators and your own voice ringtones are covered at the end of the post.

Create your Ringtones:

Step 1: Open iTunes
Step 2: Select the song you want
Step 3: Right-click and select “Get Info”
Step 4: Select the “Options” tab and set the “start and end time”. And click OK.
     iPhone has a restriction to keep ringtones for 30 seconds. You can choose any 30 seconds in the song. Listen to the song couple of times and decide your 30 secs or less.
Step 5: Right-click the song and select “Create AAC version” and wait for few seconds. (pic 3)
    iTunes will create 30 seconds AAC version. Now you have the full song and the ringtone.
Step 6: Right-click the ringtone and select Show in Windows explorer. (Refer pic 1 and pic 3)
Step 7: You will be able to see the song with m4a extension.
    If you don’t see the extension, Google and disable hide extensions options
Step 8: Now copy the m4a file and save in different folder (where you planning to keep all ring tones)
Step 9: Rename the copied file extension to m4r (pic 5)
    Click Yes / OK in the pop up window
Step 10: Double click the m4r file and it will automatically open in iTunes in Ringtones section.
Step 11: Sync your iPhone with iTunes enabling the ringtone option. All your ringtones will be included in your iPhone
Step 12: Right-click the your 30 second ringtone in iTunes and select “Delete”
    Choose “Remove” and “Move to Recycle bin” in the next options. This is to clear the 30 second version. You don’t want to have that in you library and disturb during playback. And also right-click the original song, select “Get Info” → “Options” → deselect / un-check the start and end time. This is because iTunes will keep this in memory and play the song for 30 secs.

Your own voice as ringtone:
    1) Use the voice memo app to record your singing or phrase or quote
    2) Sync your iphone
    3) Follow steps 1 to 13 and you have the ringtone with your own voice

Searching the web for ringtones:
    You can search iPhone ringtones in internet but sometimes they are not with good quality or not what you expected. The sites that offer ringtones may not be reliable some times.

Ringtone creators:
There are 100’s of apps to create ringtones directly in iPhone. All they are doing is creating the m4r version directly in your phone. Still you have to follow copy that file to different folder and double click the m4r file. Here is a quick demo for one of the app: Ringtones

Thursday, October 13, 2011

5 Things to do before upgrading to iOS 5

1) Delete useless apps:
    Delete unwanted / unnecessary apps from your device. To delete click and hold the app for few seconds, all the apps will shake with an X mark on the left hand side. Click the X mark and confirm deletion.

2) Sync your iDevice:
    Connect your iDevice (iPhone, iPod or iPad) to the computer, open iTunes. Your phone should be displayed in the iTunes and it should be the same computer which you used for the initial sync or the regular sync. Click sync. This will transfer all your purchased (paid / free) apps from iPhone to iTunes and vice versa.

3) Back up your iDevice:
    Check if you already have a back up. Choose Edit → Preferences in iTunes and go to Devices tab and check for the back up file. Otherwise back up your device by right clicking on the device name in iTunes and select Back Up. This will take some time depends on the data in your device. Be patient.

4) Download and install  iTunes (10.5):
    Download and install the latest version of iTunes from apple.com or through the apple software update in your computer. Open iTunes and click iTunes store, give your apple user id and password. (If you had forgotten your user id, you can fix it in this link)

5) Upgrade to iOS 5:
    After completing these steps, open iTunes, connect your iDevice. Select the device in iTunes and click Update button. It will prompt to download only or download and install. Choose download and install. Sit back releax with a few songs in your iTunes library.   

Guys, this is a very quick inputs for the iOS5 upgraders. No much time to take detailed screen shots. These steps will save your time and energy during upgrade. Shoot me your questions in the comments section, will try to help you.
More detailed steps: iOS5 upgrade 

Saturday, September 24, 2011

Android Emulator not running

Sometimes the android emulator hangs with a black screen while booting the emulator. This happens when the emulator is not used for few days or months. 


The following steps will help in resolving this issue:
1) Open the AVD manager (Using eclipse: Window -> Android SDK and AVD manager or 
AVD manager button in tool bar)
2) The below AVD manager window will open:
3) Select the virtual device which you want
4) Click Start, a small pop up with Launch Option will open
5) Uncheck the "Launch from snapshot" option. 
By default, the android emulator will have the "Snapshot" option enabled during AVD creation.

Note: The current removal of "open from snapshot" option will not change the existing setup in the AVD. It is only for the current run.

Share your thoughts (email / comments) on the other ways to overcome this android emulator problem...